Showing posts with label Makeup By Lyndsi. Show all posts

Thursday, January 1, 2015

♡ Edgy Wedding Makeup ♡

It was such a pleasure working with this young lady. She has such a unique personality and style. It was my goal to make that quality reflect in her Bridal Makeup. 

[You can click on these photos to make them bigger and see them in better quality]

Jasmine had a very specific look in mind for her wedding: A brown smokey eye with bold winged liner and bold red lips. I had 2 consultations with her where she tried on some looks and she decided on this makeup. She looked like a princess ♡
  
Jasmine, I wish you and your husband good luck, happiness and success in life ♡ Xoxo


For business inquiries contact me at lyndsikay234@yahoo.com.

Tuesday, August 26, 2014

♡ Update ♡ My Go-To Look Lately ♡ Confidence and Loving Yourself ♡

Hello, friends! I'm so sorry I've been MIA! It's been a busy summer for me and I've been trying to relax and enjoy every bit of it with family and friends. I've gone out of town more times than I can count this year. I've also been cutting some hair here and there. I have a couple of clients and friends that I see or come see me once a month. Aside from those things, I like my alone time as well where I just surf the internet or workout. Now that school is starting and autumn (my favorite season) is almost here (yay!), I will be updating more often.

♡♡♡
I've been wearing this makeup look almost every day for the past two? Three weeks? It's my go-to because it's easy to achieve and makes me feel confident. I rarely feel that way so it's no surprise that I continue to  wear it. To be honest, I haven't changed up my foundation routine and I'm still obsessing over the NYX Natural Palette. It's easy to create a low-key smoky eye with....


The Details:
 
On my face:  
♡  Babyface Primer by Maybelline
♡ Bareskin Brightening Foundation by Bare minerals in shade 04 Bare Ivory
♡ Prep and Prime Highlight by MAC in Light Boost for highlighting and covering dark circles
♡ ABH Contour Kit for contour and eyebrowz

♡ Milani's Baked Blush in Delizioso Pink ♡ MAC Mineralize Skinfinish Natural in Light to set everything
♡ And for this look I switch back and forth between Revlon Lip Butter in Cupcake (as seen in these photos) and MAC Mineralize Rich Lipstick.


On my eyes:
♡ "Heavens" from the Kat Von D Saint Palette on the brow bone and inner corner
 
♡ Third to last (shimmery sand) color in the NYX Natural Palette over the lid
♡ Second to last (shimmery light brown) color in the NYX Natural Palette in the crease and lower lashline
♡ Last (dark velvet brown) color in NYX Natural Palette on the outer corners and blended into the crease
♡ Winged liner connected to my bottom lashline with Sephora Liquid Eyeliner 
♡ Lined the inner rims of my top and bottom lashline with L'oreal Voluminous Smoldering Liner
♡ No false lashes lately, just Covergirl's Flamed Out Mascara 


Hair: I'm obsesssseddddd with curling my hair lately. I use this Conair 1¼ Curling Iron and curl from the ears, down. I also find that curling the front pieces (that frame the face) with a straightener looks better than using a curling iron because those pieces are shorter than the rest of the hair. After all the curling I tease the crown and spray with my holy grail Aussie Instant Freeze Hairspray.
♡♡♡
Whether I am blogging or working on a client, my goal is to help boost confidence. And how can I do that if I do not feel confident, myself? I must confess that I have never been a confident person. I've always been confident about my abilities as a hair and makeup artist, long before I went to Cosmetology school. But there's a big difference between that and actually and being comfortable or secure with yourself. I could have the biggest poof'ed up hair and I was proud of that but would I have the confidence to walk around with my head held high? No way! I would still have my shoulders slummed over and my head down. I admit, I still do that sometimes. 

It's been a long journey going from self-hate to self-love and I'm still not there yet. I imagine a lot of people in this world are going through the same thing. Whoever is out there reading this, I know we can do this. You are the only you in the whole wide world. Embrace and love every eyelash, freckle, scar, bone, every unique thing about you. Know that you are beautiful. Don't listen to people who discourage you or judge your looks in any way shape or form. Walk with your head held high and be confident! I know it's easier said than done but in time I know you and I will be okay.

Oh! And this is very important.... while working on your confidence and self-love and especially once you've achieved those things, never ever let anyone tell you that you're cocky or full of yourself. You need to know that it is 100% OKAY to love yourself, love the way you look, be confident, be confident in your abilities, etc. And while it's just as important to be humble, it's okay to be proud of yourself and the things you do and to say so every once in awhile. Society tells us "you should be proud of yourself" and then when we show it, we get pooped on. Don't buy into it. Be proud of overcoming things. And to the people who poop on you for that, they probably have the hardest battles inside to overcome. Like ignorance and hatred towards lovely people. Even more reason to disregard what they say c: 

♡♡♡

Once again, thank you for visiting my blog and for reading. I hope I've inspired you, even just a little, in some way. I hope your summer has been amazing. Leave any questions, comments or suggestions below or send me an email at lyndsixo@gmail.com. For all other business inquiries contact me at lyndsikay234@yahoo.com. Talk to ya soon! Xo

Monday, July 14, 2014

Special Occasion Hairstyle

This post is mostly me documenting my growth as a stylist. It's not meant to be a how-to but I'll include a brief how-to at the bottom of this post :) This is my second attempt at recreating this photo that I found on Pinterest:
Hair ideas
I met my young client around 9 months ago when she needed her hair done for a Quinceañera. We exchanged ideas of what she wanted through text messages and she decided on the style above. I was never big on up-do's or special occasion hair in cosmetology school. I had definitely never tried a style like this but I did her hair with confidence and this is what I came up with.... 

Not exactly like the other photo but pretty good for a first attempt using only one photo as a reference. If you're a hairstylist, you know as well as I do - it doesn't matter if we like what we did... all that really matters is how your client feels about it. You could give someone your best and then they tell you "I don't really like it" or "it's not what I wanted." I, personally, felt that since it didn't come out exactly as the photo, I didn't do a good job. My client, however, absolutely loved it. So much in fact that months later, she contacted me again for the same hairstyle for another Quince. As I styled her hair for the second time, she told me that the "flowers" (aka pin curls) are her favorite.

So this time I was determined to get it right. I looked through my pins and found that same original picture she liked and another photo that I thought would be helpful. So now I had experience and two photos for reference. The one up at the top and the one below. It is, essentially, the same style with less curl and zero pin curls. 

http://media-cache-ak0.pinimg.com/originals/6b/b1/99/6bb199a9bf3ac03ce095d3825066d35d.jpg

This is how her hair came out, the second time around...


Not exactly the same but, this is my take of that hairstyle... I love the way it turned out this time! Instead of doing a bunch of small pin curls, I did four big pin curls. I also put them lower so that it looked more like the original photo. My client loved it! She seemed more excited this time and she adored the bigger flowers. 


Here's the front view:


Things you will need: 
Curling iron(s) in the size of your choice. I used two - a one inch barrel by Conair and a 3/4 inch marcel (for small details).
Hairspray. I used Aussie Instant Freeze and it is my holy grail.
Bobbypins, large or small depending on how thick your clients hair is. I used both.

Teasing brush or comb. I used the Spornette which I got from Sally's. Also holy grail.

First I curled her hair from the ears, down.
Then I teased from the crown of her head to the back of the head stopping at the parietal bone.
After smoothing out and brushing the tease, I started the pin curls.
Next I twisted the rest of the hair below the pincurls forward while twisting the front curls back until they met and secured the pieces with bobbypins.


This is the front side view......                                                        .......And the back side view

A little more info: My client has long hair with long layers. Her hair is thick. This style took me close to 2 hours the first time I did it and around an hour this time. It seems simple enough, in theory. But it definitely takes some practice. If my client comes in a third time for this hairstyle, I'll do a more thorough how-to with step-by-step photos and in depth talk through. By then, this should be a breeze.


More photos of the back.... All of the photos in my blog entries are clickable so that they expand and you can view them in depth. I also took so many so that if anyone else out there would like to create this style, you can have more than that one reference photo from pinterest. 


Thanks for reading and for all the support! Let me know what you think! If you recreate this style, let me know your experience(s)! Leave any questions or comments below or send me an email at lyndsixo@gmail.com. For all other business inquiries contact me at lyndsikay234@yahoo.com. 
Talk to you soon! xo


Thursday, July 10, 2014

Summer Makeup Essentials FT. *NYX - My Favorite!


Hello, friends! Sorry it took me a while to update. I've been taking advantage of summer by going on vacation with my family and my birthday was on Monday so I've been limiting my internet time but I'm back now! :)


With each season, we make necessary changes in order to adapt to the time of year. More clothes during winter, less clothes during summer - you get the idea. Makeup is no exception for me. I like less coverage during the summer months. I get a natural tan, my pores can breathe and I don't have to worry about my face melting off when I sweat. In this post, I'll show you my summer makeup essentials. And if you like a little more coverage, I have options for you too ;) *Disclaimer* I am not paid by NYX nor did they send me these products. I bought all of these items with my own money, NYX is simply my favorite brand.


Prime/Prepping the skin: SPF is so important during the summer especially if you're vacationing. If you know you're going to be outdoors, make sure your skin is covered in sunscreen and depending on the amount of SPF, take the bottle with you if you know you'll be out for a while. I haven't had the chance to pick up any but I recommend Neutrogena Ultra Sheer Dry Touch. It has a wide variety and comes in different forms, all water-resistant and light weight. 
Moisturizer is also key no matter what your skin type, yes, even if you're oily. You might think that because you're already oily, or become more oily during the summer, or because you sweat more during the summer, that you don't need a moisturizer but that is a complete myth. Those factors do not make your skin moisturized. Oily =/= Moisturized. There are moisturizers out there for all skin types. One that I've started using recently is the Olay Complete All Day, which does have SPF 15. This is a product that my mother has used for years, since she was 18 so it's one that I trust.
While you're moisturizing your face, don't forget the lips! Summer time is when makeup companies bring out colorful, fruity chapsticks. Try some out and find one that lasts you more than 20 minutes. My favorite chapsticks are the Maybelline Baby Lips. These last me a good 3 hours on a regular day. I do notice my lips don't crack or peel when I use this vs. not using any chapstick at all. Oh, and they smell amazing.
Primer. This is optional but my reasons for using a primer during the summer are 1. It creates a barrier between your skin and foundation. It lays on top of your moisturizer and pushes/locks the moisturizer into your pores while making a smooth texture for your makeup to apply. Whereas if you hadn't used it, your foundation would slip and slide on top of any moisturizers or sunscreen.
2. It makes your makeup last longer. If you do prefer full coverage, this will keep your foundation from sliding off. If your prefer light/sheer coverage, those foundations don't tend to last very long. They begin to fade and slide off easily so this will also make those last all day.
3. If you prefer light coverage, you can use this as a base alone and it will fill in pores/fine lines/wrinkles, blur/soften imperfections, and smooth an uneven skin texture.
I, personally, use a primer all the time now. The one I prefer is Baby Skin by Maybelline which is a dupe for the Smashbox Photo Finish Primer in my opinion. 


Foundation/Base: During the summer months I opt for a BB Cream, CC Cream or Tinted Moisturizer. Anything light. Lately I've been reaching for two different foundations, one high end and one drugstore. 
My favorite highend foundation is the BareSkin Pure Brightening Serum Foundation Broad Spectrum SPF 20 in the shade Bare Ivory 04. This is probably the lightest coverage foundation I've ever used. Lighter than a BB/CC Cream or Tinted Moisturizer. So light that I no longer apply it with a brush. I prefer a damp Beauty Blender. Even though it may give the look of full coverage it feels like I just applied a light oil to my face. For the lightest effect, this product can be used with a brush or your fingers. 
As for my favorite drugstore foundation, I've been loving the NYX BB Cream in the shade Natural. It only comes in three shades but I assume these shades can adjust to your skin tone since it comes in a small range of colors. I was impressed by this product. Most BB Creams don't last very long but this one lasts me all day and has a natural finish.
For a fuller coverage, long lasting foundation, I prefer any foundation by Rimmel. Honestly, when it comes to foundations, this brand has exceeded my expectations. My favorite is Rimmel Lasting Finish 25 Hour Foundation in shade 100 Ivory. This foundation lasts through sweat, heat, humidity, etc. If you're going to be out all day and you love full coverage, this will be your bestfriend this summer. 

Cheeks/Highlight/Bronzer: Summer is the perfect time to use cream products and sport a bronzy glow. The reason why I like cream blushes, highlighters and bronzers during the summer is because most of them are water resistant (not to be confused with water proof) and sweat resistant. And you can always set them with powder.
Lately I've been using the NYX Stick Blushes in Pink Lotus and Tulip. These blushes are super thick, I would not recommend applying it straight from the tube to your face for a few reasons... First it's unsanitary, especially if your skin is sensitive and prone to break outs. Second, it's so thick that if you're wearing a foundation or primer underneath, it will move and drag your makeup around. With clean hands I use two fingers and rub/warm up the product until it gets creamy and then dab it on my cheeks until it looks even. You can also go over it with a brush to even it out more.
And if you're not into cream products or you want to set them, an excellent powder blush for the summer is the NYX Powder Blush in either Rose Garden or Summer Peach. 
Those blushes (both cream and powder) have flecks of gold shimmer so when I use those, I don't use a shimmer highlight my cheek bones. If you opt for a matte blush or don't use a blush at all, a powder highlight that resembles those NYX Blushes is the NYX Illuminator in shade 01 Narcissistic. A matte cream highlight that I like to use (and is awesome to contour with also!) is the BH Cosmetics 10 Color Concealer Palette. This is best used with your fingers or a paddle brush.
For bronzer, choosing a matte or shimmer is your choice. Just remember not to overdose with shimmer products. You don't want to leave the house looking oily or like a disco ball! It's all about balance. Personally, I hardly bronze my face. It's all a matter of preference. I choose to only contour on myself, nothing more. Bronzers that I would recommend to a client are, again, the BH Cosmetics 10 Color Concealer Palette. I like to mix shades to find the perfect color that compliments the skin. Another option is the Sonia Kashuk Creme Bronzer which you can find at Target.

Eyes: Using waterproof mascaras and eyeliners are for the best during the summer if you're going to be out all day in the sun. It's super hot outside but your liner won't melt or smudge and your mascara won't smear. This is what I would recommend but just as everything else, it's all according to your personal preference. I would also suggest against using cream/gel liner or pencil liner, as it smears a lot easier.
My favorite eyeliner as of lately has been the L'Oreal Infallible Super Slim Liquid Liner and an exact dupe for this down to the packaging is the Milani Eye Tech Extreme. Between the two, I prefer L'Oreal just because I noticed it lasted 3 more weeks than the Milani Liner but other than that I wouldn't notice a difference between the two. These liners last all day long and don't smear.


As for mascara, I use not one but three different mascaras. Covergirl Flamed Out Mascara, L'Oreal Voluminous Miss Manga, and L'Oreal Voluminous Butterfly Mascara. These three mascaras, both individually and all together, create a "spider lash" effect (as seen on the left <<<)
For eyeshadow, I've been using the Natural Palette by NYX. This range of colors are perfect for summer and there is a variety of textures from matte to velvet to sparkle. The only complaint I have with this product is that the colors often look a lot less pigmented on the skin than in the palette. Even with the use of a highend primer such as the Urban Decay Primer Potion, the colors can still look washed out some times. My advice would be to use this with white eyeshadow base such as the NYX Jumbo Eye Pencil in Milk or their very own NYX Eyeshadow Base in White so that the shadows show up true to color and pigmented.
Lips: Over chapstick, I like to layer a NYX Extra Creamy Round Lipstick and NYX Xtreme Lip Cream. The round lipsticks have a wide variety of colors but for me, this summer has been all about natural/neutral colors (if you couldn't already tell) so I stuck to the color Circle which is a beige shade. Over top I use the lip cream in Natural which has more of an orange tone. Neither of these products will dry out your lips and give them a nice shine.

In the bottom photo you can see my "summer everyday go-to" look using these products. It's ironic pairing neutral and natural colors with a dramatic wing, don't ya think? But that's me! Haha. I don't think I could ever give up the wings...

Those are my makeup essentials this summer. Try some out and let me know what you think about them! Or tell me what your own makeup essentials are and I'll try those out! Leave any questions/comments or suggestions for what you'd to see next below or send me an email at lyndsixo@gmail.com. For all other business inquiries contact me at lyndsikay234@yahoo.com. I hope you all are having fun in the sun and safely enjoying the warm (sometimes scorching hot) weather outside! Until next time, take care and I'll talk to you soon! xo


Tuesday, June 24, 2014

ABH Contour Kit: EYES?! Quick Review + Swatches + MOTD/FOTD


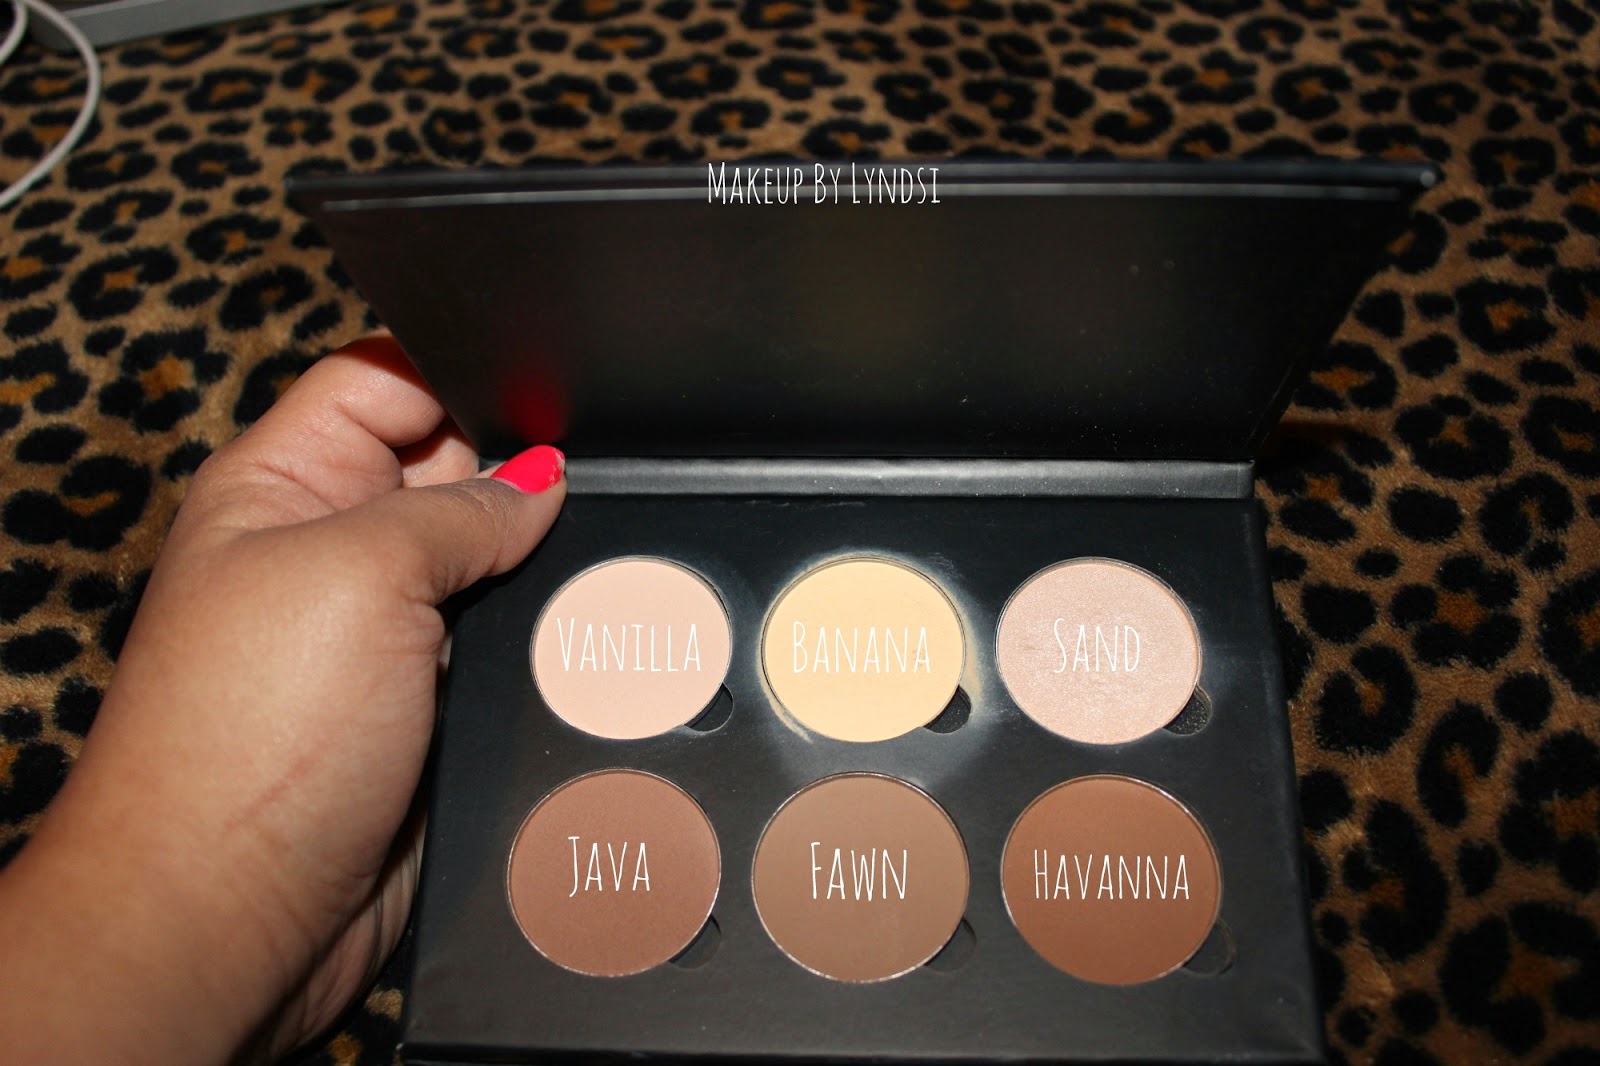
It's a wonder I finally got my hands on this palette. I couldn't even begin to tell you how hard it was to get a hold of after being sold out twice from Sephora online and in stores and on ABH's website until recently. No doubt it is by far one of the hottest and best selling products in the make up world. And why not? In only 6 colors, the Anastasia Contour Kit has the perfect shades to sculpt, lift and brighten your face. This is an essential for your makeup collection, especially if you're a makeup artist. It is holy grail. It's $40 and according to Anastasia, they will be selling refillable pans for this palette at $14 each soon. In my opinion, it is definitely worth the investment.

Below I have a photo of the Contour Kit and Swatches on my arm both with each name on each shade. Every color in this palette is a matte except sand which has shimmer.  


Obviously these colors are gorgeous. I had to try them out on my eyes. Neutrals are my favorite when it comes to eyeshadow.


  MOTD/FOTD
EYES: On my lids I have Banana. Sand is on the brow bone and inner corner to highlight those areas. In my crease I have Fawn. On the outer corner I blended the three dark shades for depth. I opted for a dark brown shade out of another palette and also liquid liner and heavy mascara. Without those last three, you're left with a beautiful, natural finish but I couldn't resist going all out. I also used Fawn to fill in my eyebrows 
FACE: My face is primed with Baby Skin by Maybelline. Foundation used is Bare Skin by Bareminerals in shade Bare Ivory 04 and set with Vanilla from the Contour Kit. I used Maybelline Age Rewind Concealer to highlight, Banana to set it and Fawn to bronze the face. 
LIPS: MAC's Mineralize Rich in Luxe Natural


Now you know how I feel about this Kit. Let me know what you think about this product and this eye look. Leave any questions/comments below or send me an email at
lyndsixo@gmail.com. For all other business inquiries contact me at
lyndsikay234@yahoo.com. Talk to you soon! xo


Saturday, June 21, 2014

Summer Sunset Inspired Makeup Look

Hello, Friends! This makeup look was inspired by the beautiful summer sunset. I'm still new to beauty blogging but let me know what you think! Enjoy... (:


Here I have the products I used listed and linked but they are interchangeable so you don't have to use these exact products to recreate this look if you don't want to.

Face Primer- Maybelline Baby Skin

Foundation- NYX BB Cream in Nude applied with a damp Beauty Blender Sponge

Eyebrows- Kat Von D True Romance Palette in Saint, in the color Bookworm, applied with an angled brush

Eyeshadow- All the eye shadows used are from the BH Cosmetics 28 Neutral Color Palette. First I applied a thin layer of Urban Decay's Original Eyeshadow Primer Potion. Next I applied the light pink shade from the palette all over my lid and a little above my crease with my finger. This is the only pink color in the palette and it has flecks of gold pigment. Then, with a blending brush, I applied the matte dark plum shade into my crease to define it. While applying, I made sure to blend very well so there are no harsh edges and to lighten the color a little. After that, I took a dense eyeshadow brush with the same plum color and applied it directly to the outer lid, connecting it to my my bottom lash line in a v-shape. This outer corner is also known as the outer v. Lastly, for the inner corner of the eye I used the iridescent silvery white shade in the palette with my finger. This color has flecks of light blue in it.


Eyeliner & Mascara- Using L'Oreal's Infallible Super Slim Liquid Eyeliner in Black, I lined my eyes, winging it out at the ends and connecting it to my bottom lash line only halfway. I also liked my water line and tight lined with L'oreal Voluminous Smoldering Eyeliner in Black. The I curled my lashes and applied Cover Girl's Flamed Out Mascara.

Blush & Highlight- For Blush I applied Milani Baked Powder Blush in the color Delizioso Pink. For Highlight on top of the cheekbones, I used the same iridescent eyeshadow that I previously used for my inner corner highlight.

Lips- Revlon Lip Butter in Cupcake

Lastly I set everything with MAC Mineralize Skinfinish Natural in the shade Light using a Beauty Blender. This is the final look... 

 
Thanks for reading! If you have any questions or comments leave them here or email me at lyndsixo@gmail.com. For business inquiries email me at lyndsikay234@yahoo.com. Talk to you soon! xo